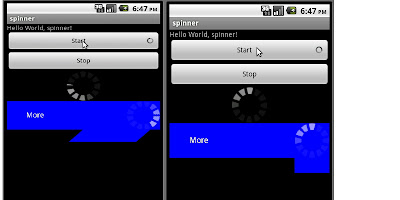
I was trying to implement a spinner at the end of button, to indicate user that some background connection to internet was going on to fetch some data.
First approach i took was to implement a
Frame animation. - Create a different images of spinner at different positions and then add a each images to animationDrawable instance and set the drawable to button using
'setCompoundDrawable()' api as defined below
http://developer.android.com/reference/android/widget/TextView.html#setCompoundDrawables(android.graphics.drawable.Drawable, android.graphics.drawable.Drawable, android.graphics.drawable.Drawable, android.graphics.drawable.Drawable)When needed to start/stop use start() and stop() apis and
setCompoundDrawable(null,null,null,null) to hide the drawable.
package com.mani.spinner;

import android.app.Activity;
import android.graphics.drawable.Animatable;
import android.graphics.drawable.AnimationDrawable;
import android.graphics.drawable.Drawable;
import android.os.Bundle;
import android.view.View;
import android.widget.Button;

public class spinner extends Activity {
    /** Called when the activity is first created. */
 Drawable spinnerAnimation;
 Drawable spinnerBackground;
 Button b1;
 Button b2;
 sample view;
    @Override
    public void onCreate(Bundle savedInstanceState) {
        super.onCreate(savedInstanceState);
        setContentView(R.layout.main);
        view = (sample)findViewById(R.id.sampleView);

        spinnerAnimation = new AnimationDrawable();
        spinnerAnimation.setBounds(0, 0, 20, 20);

  spinnerBackground =getApplicationContext().getResources().getDrawable(R.drawable.a1);
  ((AnimationDrawable)spinnerAnimation).addFrame(spinnerBackground, 200);

  spinnerBackground =getApplicationContext().getResources().getDrawable(R.drawable.a2);
  ((AnimationDrawable)spinnerAnimation).addFrame(spinnerBackground, 200);

  spinnerBackground =getApplicationContext().getResources().getDrawable(R.drawable.a3);
  ((AnimationDrawable)spinnerAnimation).addFrame(spinnerBackground, 200);

  spinnerBackground =getApplicationContext().getResources().getDrawable(R.drawable.a4);
  ((AnimationDrawable)spinnerAnimation).addFrame(spinnerBackground, 200);

  spinnerBackground =getApplicationContext().getResources().getDrawable(R.drawable.a5);
  ((AnimationDrawable)spinnerAnimation).addFrame(spinnerBackground, 200);

  spinnerBackground =getApplicationContext().getResources().getDrawable(R.drawable.a6);
  ((AnimationDrawable)spinnerAnimation).addFrame(spinnerBackground, 200);

  spinnerBackground =getApplicationContext().getResources().getDrawable(R.drawable.a7);
  ((AnimationDrawable)spinnerAnimation).addFrame(spinnerBackground, 200);

  spinnerBackground =getApplicationContext().getResources().getDrawable(R.drawable.a8);
  ((AnimationDrawable)spinnerAnimation).addFrame(spinnerBackground, 200);

  spinnerBackground =getApplicationContext().getResources().getDrawable(R.drawable.a9);
  ((AnimationDrawable)spinnerAnimation).addFrame(spinnerBackground, 200);

  spinnerBackground =getApplicationContext().getResources().getDrawable(R.drawable.a10);
  ((AnimationDrawable)spinnerAnimation).addFrame(spinnerBackground, 200);

  spinnerBackground =getApplicationContext().getResources().getDrawable(R.drawable.a11);
  ((AnimationDrawable)spinnerAnimation).addFrame(spinnerBackground, 200);

  ((AnimationDrawable)spinnerAnimation).setOneShot(false);

        b1 = (Button)findViewById(R.id.button1);
        b1.setCompoundDrawables(null, null, spinnerAnimation, null);
        b1.setOnClickListener(new View.OnClickListener() {

   public void onClick(View v) {
   b1.setCompoundDrawables(null, null, spinnerAnimation, null);
   ((Animatable)spinnerAnimation).start();

   }
  });
        b2 = (Button)findViewById(R.id.button2);
        b2.setOnClickListener(new View.OnClickListener() {

   public void onClick(View v) {

   ((Animatable)spinnerAnimation).stop();
   b1.setCompoundDrawables(null, null, null, null);

   }
  });

    }
}
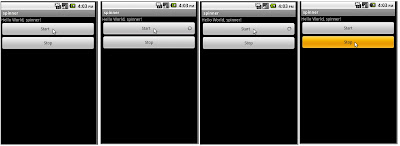
More info on Frame animation you can check here :
http://iserveandroid.blogspot.com/2010/10/frame-animation-circular-spinner.htmlI was thinking how to use one image and rotate it to bring the same effect of spinning. Then i tried this approach.
Second approach rotate animation resourceSpin.xml @res/anim folder.
xmlns:android="http://schemas.android.com/apk/res/android"
android:repeatCount="infinite"
android:duration="1000"
android:pivotX="50%"
android:pivotY="50%"
android:fromDegrees="0"
android:toDegrees="360" />
ImageView v1;
Animation mAnimation = AnimationUtils.loadAnimation(mContext, R.anim.spin);
v1.startAnimation(mAnimation);
Load the animation and apply to a image. But i could bring this effect to only the spinner image alone. Together with button and spinner @ end of button, i couldnt achieve using this.
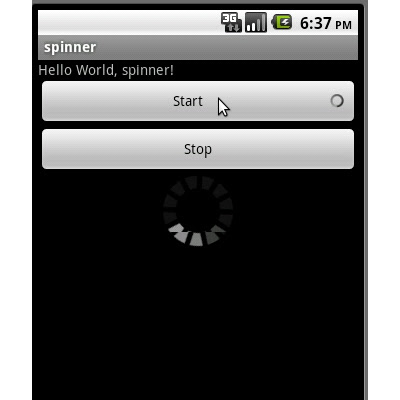
Then i planned to create a custom view and create a button kinda of illusion and draw the spinner bitmap with different angles and create the effect like spinner @ end of button.
Third approach: Custom View- Inherit from View class and over ride onDraw() method.
- Some special api's in canvas allows you to achieve the spinning of image.
  canvas.drawRect(mButtonRect, mPaint);
  canvas.drawText("More", 40,40, mPaint);
  canvas.save();
  canvas.translate(mSpinnerX,0);
  canvas.rotate(mAngle,mSpinnerPivotX,mSpinnerPivotY);
  canvas.drawBitmap(mSpinnerBitmap, null, mSpinnerRect, mPaint);
  canvas.restore();
- there is a option in canvas to 'save' and 'restore'. using these apis we can save the canvas state and do some manipulation to new canvas, place objects whereever needed and then do restore so that canvas contents before save is drawn without disturbed.
- Like in this, a rectangle is drawn (imagine a button ) and a text on the button is drawn at correct cordinates.
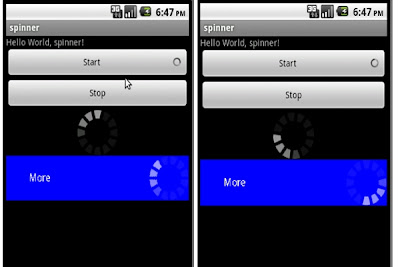
- Then 'save' the canvas and move the canvas to the 80% length of the screen(or width of the button) using 'translate' and rotate the canvas by certain angle then draw the spinner bitmap. It looks like the bitmap is drawn at the end of original canvas with rotated.
- When the angle is kept incremented using a runnable and invalidate() is called, then you would see like the image is rotated at the end...!!
-make the view class implement 'Runnable" and implement run as below to call onDraw() for every angle change.
public void run()
    {
     if(mAngle == 360)
      mAngle=45;
     else
      mAngle+=45;
     invalidate();
     mHandler.postDelayed(this, 100);
    }
main.xml:
----------
    android:orientation="vertical"
    android:layout_width="fill_parent"
    android:layout_height="fill_parent"
    >
    android:layout_width="fill_parent"
    android:layout_height="wrap_content"
    android:text="@string/hello"
    />
    android:id="@+id/button1"
    android:layout_width="fill_parent"
    android:layout_height="wrap_content"
    android:text="Start"
/>
    android:id="@+id/button2"
    android:layout_width="fill_parent"
    android:layout_height="wrap_content"
    android:text="Stop"
/>
    android:id="@+id/image"
    android:src="@drawable/spinner_white_48"
    android:layout_width="fill_parent"
    android:layout_height="wrap_content"
/>
    android:id="@+id/sampleView"
    android:layout_width="fill_parent"
    android:layout_height="fill_parent"
/>
sample.java:
package com.mani.spinner;

import android.content.Context;
import android.graphics.Bitmap;
import android.graphics.BitmapFactory;
import android.graphics.Canvas;
import android.graphics.Color;
import android.graphics.Paint;
import android.graphics.Rect;
import android.os.Handler;
import android.util.AttributeSet;
import android.view.Display;
import android.view.View;
import android.view.WindowManager;

public class sample extends View implements Runnable{

 Bitmap mSpinnerBitmap;
 Paint mPaint;
 Rect mSpinnerRect;
 Rect mButtonRect;
 int mButtonWidth;
 int mButtonHeight;
 int mSpinnerX;
 int mSpinnerPivotX;
 int mSpinnerPivotY;
 int mSpinnerWidth;
 int mSpinnerHeight;
 boolean mSpinnerVisible;
 Runnable mTask;
 float mAngle=0;

 Handler mHandler = new Handler();
 String mButtonText="More";
 public sample(Context context,AttributeSet attrs)
 {
  super(context,attrs);
  mSpinnerBitmap = BitmapFactory.decodeResource(context.getResources(), R.drawable.spinner_white_48);
  mPaint = new Paint();
     mPaint.setColor(0xFF0000FF);
     mPaint.setTextSize(16);

     Display display = ((WindowManager)context.getSystemService(context.WINDOW_SERVICE)).getDefaultDisplay();
  mButtonWidth = display.getWidth();
  mButtonHeight = 70;
  mSpinnerHeight = mSpinnerWidth = mButtonHeight;
  mSpinnerPivotX = mSpinnerPivotY = mSpinnerWidth /2;
  mSpinnerX = (mButtonWidth-mButtonHeight);
     mSpinnerRect = new Rect(0,0,mSpinnerWidth,mSpinnerHeight);
     mButtonRect = new Rect(0,0,mButtonWidth,mButtonHeight);
 }
 public void setText(String text)
 {
  mButtonText = text;
 }
 public void setTextSize(int size)
 {
   mPaint.setTextSize(size);
 }

 public void setButtonColor(Color color)
 {

 }
 public void start()
 {
  mHandler.post(this);
  mSpinnerVisible = true;
 }

 public void stop()
 {
  mSpinnerVisible = false;
  mHandler.removeCallbacks(this);
  invalidate();
 }

 public void run()
    {
     if(mAngle == 360)
      mAngle=45;
     else
      mAngle+=45;
     invalidate();
     mHandler.postDelayed(this, 100);
    }

 @Override
 public void onDraw(Canvas canvas)
 {

  canvas.drawRect(mButtonRect, mPaint);
  canvas.drawText("More", 40,40, mPaint);
  if(mSpinnerVisible == true)
  {
   canvas.save();
   canvas.translate(mSpinnerX,0);
   canvas.rotate(mAngle,mSpinnerPivotX,mSpinnerPivotY);
   canvas.drawBitmap(mSpinnerBitmap, null, mSpinnerRect, mPaint);
   canvas.restore();
  }

 }

}
Note: If you would like to see how the canvas is rotated, create a visibleRect using view's height and width and draw a rectangle. Which will show you that entire canvas content is rotated.
Rect visibleRect;
visibleRect.set(0, 0, this.getWidth(), this.getHeight());
if(mSpinnerVisible == true)
{
canvas.save();
canvas.translate(mSpinnerX,0);
canvas.rotate(mAngle,mSpinnerPivotX,mSpinnerPivotY);
canvas.drawRect(visibleRect, mPaint); canvas.drawBitmap(mSpinnerBitmap, null, mSpinnerRect, mPaint);
canvas.restore();
}