Everybody's aware that inside a dialog, a custom view can be set.
In this post, i am going to discuss how do we set a custom gridview as the custom view for dialog.
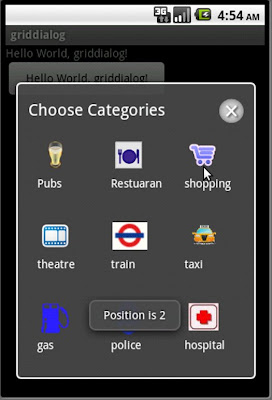
My requirement was to display a grid of options for the user to pick up a categories with a icons shown in a 3x3 matrix. User can choose a one by touching it. And the dialog had a title and at the right end a close button to dismiss the dialog.
I will take through step by steps.
1 - Dialog onCreateDialog(int id) --> Is the function which will be called by framework,when an activity has implmented and showDialog(int id ) is called on activity's instance.
So we go ahead and implement this onCreateDialog(int id) function.
2 - LayoutsThe view can be split into two parts.
- LinearLayout vertical orientation holding two elements.
- RelativeLayout - Title and Exit icons at the right extreme.
- GridView - Display 3x3 icons& text as a view.
CategoryDialog.xml
----------------------
<LinearLayout xmlns:android="http://schemas.android.com/apk/res/android"
              android:id="@+id/layout_root"
              android:orientation="vertical"
              android:layout_width="fill_parent"
              android:layout_height="fill_parent"
              android:padding="10dp"
              >
<RelativeLayout
android:orientation="vertical"
android:layout_width="fill_parent"
android:layout_height="wrap_content"
android:paddingTop="3dip" >
    <ImageView android:id="@+id/close"
    android:layout_width="30dip"
    android:layout_height="30dip"
               android:layout_alignParentRight="true"
               android:layout_marginRight="3dp"
               android:src="@drawable/exit"
               />
    <TextView android:id="@+id/text1"
              android:layout_width="wrap_content"
              android:layout_height="wrap_content"
              android:layout_centerHorizontal="true"
              android:layout_alignParentLeft="true"
              android:layout_marginLeft="3dp"
              android:textColor="#FFF"
              android:textSize="20dip"
              android:text="Choose Categories"/>
</RelativeLayout>

 <GridView xmlns:android="http://schemas.android.com/apk/res/android"
    android:id="@+id/gridview"
    android:layout_width="fill_parent"
    android:layout_height="fill_parent"
    android:columnWidth="90dp"
    android:numColumns="3"
    android:verticalSpacing="10dp"
    android:horizontalSpacing="10dp"
    android:stretchMode="columnWidth"
    android:gravity="center"/>
</LinearLayout>
3 - Creating Dialog Lets use the AlertDialog and set the categoryDialog.xml layout to its setView() api to show the content. what we are exepecting.
Use inflater to create a view by inflating
R.layout.categorydialog
 AlertDialog.Builder builder;
            Context mContext = this;
            LayoutInflater inflater = (LayoutInflater) mContext.getSystemService(LAYOUT_INFLATER_SERVICE);
            View layout = inflater.inflate(R.layout.categorydialog,(ViewGroup) findViewById(R.id.layout_root));
            builder = new AlertDialog.Builder(mContext);
            builder.setView(layout);
            dialog = builder.create();
            return dialog;
4- Creating GridView. View layout = inflater.inflate(R.layout.categorydialog,(ViewGroup) findViewById(R.id.layout_root));
GridView gridview = (GridView)layout.findViewById(R.id.gridview);
gridview.setAdapter(new ImageAdapter(this));
- Get the gridView instance from the inflated layout and set a adapter object to draw its content.
- We need to implement a BaseAdapter and when the adapter instance is set to GridView , GridView queries for how many elements and what are their each view to display in the Grid.
- Each view in the grid is Icon (image) and a text corresponding to the category. So we need to create one more layout xml file to hold these content.
categoryContent.xml
--------------------
<LinearLayout xmlns:android="http://schemas.android.com/apk/res/android"
              android:orientation="vertical"
              android:layout_width="fill_parent"
              android:layout_height="fill_parent"
              android:padding="10dp"
              >
    <ImageView android:id="@+id/categoryimage"
      android:layout_width="50dip"
    android:layout_height="50dip"
    android:layout_alignParentRight="true"
               android:layout_marginRight="3dp"/>
    <TextView android:id="@+id/categoryText"
              android:layout_width="wrap_content"
              android:layout_height="wrap_content"
              android:layout_centerHorizontal="true"
              android:layout_alignParentLeft="true"
              android:layout_marginLeft="3dp"
              android:textColor="#FFF"/>

</LinearLayout>
5 - Create a view inflating this layout xml file and set the LayoutParams for each cell size as 90x90.
         convertView = mInflater.inflate(R.layout.categorycontent, null);
         convertView.setLayoutParams(new GridView.LayoutParams(90, 90));
Note: Since this a view which will be set in GridView as one element of Grid, the layout params must be of type GridView.LayoutParams. This is very important otherwise, the programs will crash in run-time.
 public class ImageAdapter extends BaseAdapter {
        private Context mContext;
        private LayoutInflater mInflater;
        public ImageAdapter(Context c) {
         mInflater = LayoutInflater.from(c);
            mContext = c;
        }
        public int getCount() {
            return mThumbIds.length;
        }
        public Object getItem(int position) {
            return null;
        }
        public long getItemId(int position) {
            return 0;
        }
        // create a new ImageView for each item referenced by the
        public View getView(int position, View convertView, ViewGroup parent) {
         ViewHolder holder;
            if (convertView == null) {  // if it's not recycled,
                 convertView = mInflater.inflate(R.layout.categorycontent, null);
               convertView.setLayoutParams(new GridView.LayoutParams(90, 90));
              holder = new ViewHolder();
                 holder.title = (TextView) convertView.findViewById(R.id.categoryText);
                 holder.icon = (ImageView )convertView.findViewById(R.id.categoryimage);
                 convertView.setTag(holder);
             } else {
                 holder = (ViewHolder) convertView.getTag();
             }
    holder.icon.setAdjustViewBounds(true);
    holder.icon.setScaleType(ImageView.ScaleType.CENTER_CROP);
    holder.icon.setPadding(8, 8, 8, 8);
    holder.title.setText(categoryContent[position]);
    holder.icon.setImageResource(mThumbIds[position]);
    return convertView;
        }
        class ViewHolder {
            TextView title;
            ImageView icon;
        }
        // references to our images
        private Integer[] mThumbIds = {
                R.drawable.beer, R.drawable.hotel,R.drawable.shopping,
                R.drawable.theatre,R.drawable.train, R.drawable.taxi,
                R.drawable.gas, R.drawable.police,R.drawable.hospital
                };

     }
    private String[] categoryContent = {
          "Pubs", "Restuarants","shopping",
          "theatre","train", "taxi",
          "gas", "police","hospital"
          };
}
griddialog.java
--------------------
Everybody's aware that inside a dialog, a custom view can be set.
In this post, i am going to discuss how do we set a custom gridview as the custom view for dialog.
My requirement was to display a grid of options for the user to pick up a categories with a icons shown in a 3x3 matrix. User can choose a one by touching it. And the dialog had a title and at the right end a close button to dismiss the dialog.
I will take through step by steps.
1 - Dialog onCreateDialog(int id) --> Is the function which will be called by framework,when an activity has implmented and showDialog(int id ) is called on activity's instance.
So we go ahead and implement this onCreateDialog(int id) function.
2 - LayoutsThe view can be split into two parts.
- LinearLayout vertical orientation holding two elements.
- RelativeLayout - Title and Exit icons at the right extreme.
- GridView - Display 3x3 icons& text as a view.
CategoryDialog.xml
----------------------
package com.android.griddialog;

import android.app.Activity;
import android.app.AlertDialog;
import android.app.Dialog;
import android.content.Context;
import android.os.Bundle;
import android.view.LayoutInflater;
import android.view.View;
import android.view.ViewGroup;
import android.widget.AdapterView;
import android.widget.BaseAdapter;
import android.widget.Button;
import android.widget.GridView;
import android.widget.ImageView;
import android.widget.TextView;
import android.widget.Toast;
import android.widget.AdapterView.OnItemClickListener;

public class griddialog extends Activity {
 public final int CATEGORY_ID =0;
 private Context mContext;
 Dialog dialog;
    /** Called when the activity is first created. */
    @Override
    public void onCreate(Bundle savedInstanceState) {
        super.onCreate(savedInstanceState);
        mContext = getApplicationContext();
        setContentView(R.layout.main);
        Button button = (Button)findViewById(R.id.categories);
        button.setOnClickListener(new Button.OnClickListener(){
            public void onClick(View v) {
                    showDialog(CATEGORY_ID);
            }
        });
    }
    protected Dialog onCreateDialog(int id) {

        switch(id) {

        case CATEGORY_ID:

         AlertDialog.Builder builder;
            Context mContext = this;
            LayoutInflater inflater = (LayoutInflater) mContext.getSystemService(LAYOUT_INFLATER_SERVICE);
            View layout = inflater.inflate(R.layout.categorydialog,(ViewGroup) findViewById(R.id.layout_root));
            GridView gridview = (GridView)layout.findViewById(R.id.gridview);
            gridview.setAdapter(new ImageAdapter(this));

            gridview.setOnItemClickListener(new OnItemClickListener()
            {
                public void onItemClick(AdapterView parent, View v,int position, long id) {
                 Toast.makeText(v.getContext(), "Position is "+position, 3000).show();
                 }
            });

            ImageView close = (ImageView) layout.findViewById(R.id.close);
            close.setOnClickListener(new View.OnClickListener() {
    public void onClick(View v){
              dialog.dismiss();
            }
            });

            builder = new AlertDialog.Builder(mContext);
            builder.setView(layout);
            dialog = builder.create();
            break;
        default:
            dialog = null;
        }
        return dialog;
    }

  public class ImageAdapter extends BaseAdapter {
        private Context mContext;
        private LayoutInflater mInflater;
        public ImageAdapter(Context c) {
         mInflater = LayoutInflater.from(c);
            mContext = c;
        }
        public int getCount() {
            return mThumbIds.length;
        }
        public Object getItem(int position) {
            return null;
        }
        public long getItemId(int position) {
            return 0;
        }
        // create a new ImageView for each item referenced by the
        public View getView(int position, View convertView, ViewGroup parent) {
         ViewHolder holder;
            if (convertView == null) {  // if it's not recycled,
                 convertView = mInflater.inflate(R.layout.categorycontent, null);
               convertView.setLayoutParams(new GridView.LayoutParams(90, 90));
              holder = new ViewHolder();
                 holder.title = (TextView) convertView.findViewById(R.id.categoryText);
                 holder.icon = (ImageView )convertView.findViewById(R.id.categoryimage);
                 convertView.setTag(holder);
             } else {
                 holder = (ViewHolder) convertView.getTag();
             }
    holder.icon.setAdjustViewBounds(true);
    holder.icon.setScaleType(ImageView.ScaleType.CENTER_CROP);
    holder.icon.setPadding(8, 8, 8, 8);
    holder.title.setText(categoryContent[position]);
    holder.icon.setImageResource(mThumbIds[position]);
    return convertView;
        }
        class ViewHolder {
            TextView title;
            ImageView icon;
        }
        // references to our images
        private Integer[] mThumbIds = {
                R.drawable.beer, R.drawable.hotel,R.drawable.shopping,
                R.drawable.theatre,R.drawable.train, R.drawable.taxi,
                R.drawable.gas, R.drawable.police,R.drawable.hospital
                };

     }
    private String[] categoryContent = {
          "Pubs", "Restuarants","shopping",
          "theatre","train", "taxi",
          "gas", "police","hospital"
          };


}


